
Building Instructions > Assassin 37" Airplane > Wing Assembly
Wing Assembly
Wing Preperation

Note: For Assassinsuse the included Flat Head Socket Cap Screw M5 × 35mm in this step. Also use the original aluminum spacers from your Shapeoko 2. The pulley can be positioned in a variety of places on the shaft of th WING PREPARATION – the Assassin flies well with or without fins. We found ourselves frequently reattaching the fins on the wingtips of our combat planes, so we got rid of the fins. Our angled tips on the Assassin’s fat airfoil create stabilizing drag like a fin and make it incredibly stable at speed. Many flyers are not doing combat and like the more solid tracking and improved slower flight performance with fins. Here are instructions for both. It’s your choice. 1. Rub the EPP foam surfaces with another piece of EPP foam to get the melted fibers off. Use your fingernail to pick off any stubborn fibers. You can also use a disposable razor to shave the EPP foam to get the fibers off. 2. Glue the wing halves together with low-temperature hot glue, Goop, or Shoe Goo. 3. Skip to SPAR instructions if you are building your Assassin with fins. (The Widowmaker needs fins.) 4. To build the Assassin without fins, you will need to cut a flat-faced angle onto the front of the tips. This gives some resistance on either side of the wing to stabilize the plane and prevent unwanted yaw during flight. 5. To cut angles in the tips, for flying without fins, use your ruler to measure from the leading corner of one wingtip, 2” (5 cm) in along the leading edge, towards the nose. Place a mark at that point with your pen. 6. Also measure from the leading corner of the wingtip, back along the outside edge of the wing, and place a mark at 2” (5 cm). 7. Lay your straight edge from the 2” mark on the leading edge, to the 2” mark on the side of the wing. Use a sharp razor blade to cut this corner off of the wingtip. Do not round the corners. The flat surface is part of the design. 8. Repeat on other wingtip. Make sure both wing tips are exactly the same. Wing Halves
Fins or Finless
Spar
Shock Cord
Formica Plate
Scotch Extreme Tape
1. Wing Preperation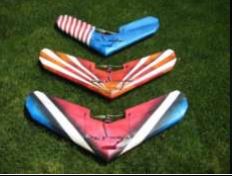
WING PREPARATION – the Assassin flies well with or without fins. We found ourselves frequently reattaching the fins on the wingtips of our combat planes, so we got rid of the fins. Our angled tips on the Assassin’s fat airfoil create stabilizing drag like a fin and make it incredibly stable at speed. Many flyers are not doing combat and like the more solid tracking and improved slower flight performance with fins. Here are instructions for both. It’s your choice. 1. Rub the EPP foam surfaces with another piece of EPP foam to get the melted fibers off. Use your fingernail to pick off any stubborn fibers. You can also use a disposable razor to shave the EPP foam to get the fibers off. 2. Glue the wing halves together with low-temperature hot glue, Goop, or Shoe Goo. 3. Skip to SPAR instructions if you are building your Assassin with fins. (The Widowmaker needs fins.) 4. To build the Assassin without fins, you will need to cut a flat-faced angle onto the front of the tips. This gives some resistance on either side of the wing to stabilize the plane and prevent unwanted yaw during flight. 5. To cut angles in the tips, for flying without fins, use your ruler to measure from the leading corner of one wingtip, 2” (5 cm) in along the leading edge, towards the nose. Place a mark at that point with your pen. 6. Also measure from the leading corner of the wingtip, back along the outside edge of the wing, and place a mark at 2” (5 cm). 7. Lay your straight edge from the 2” mark on the leading edge, to the 2” mark on the side of the wing. Use a sharp razor blade to cut this corner off of the wingtip. Do not round the corners. The flat surface is part of the design. 8. Repeat on other wingtip. Make sure both wing tips are exactly the same.
2. Wing Halves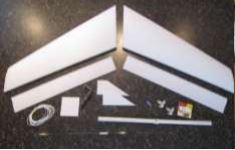
FORMICA PLATE – Formica is thinner and stronger than plywood. 21.Place the Formica plates on the bottom of the wing, white side out, at the center of the trailing edge. The plate should hang over the trailing edge at least enough that the stainless steel motor mount won’t be resting on the foam. 22.Make sure that the spar is not under the large hole in the motor mount if you are going to add a bomb drop. 23.Center the plate, and mark with a pen on the EPP foam where the corners are. 24.Put low temperature hot glue on the foam (not the plate) where the plate will be, and quickly but accurately affix the plate. If you apply the glue to the plate it will cool and set before you can get it in position on the wing. 25.Do not attach the stainless steel motor mount at this point. That will be done after laminating the wing.
|
Build ProgressBuild Time
Steps in this section
NavigationNote: For Assassinsuse the included Flat Head Socket Cap Screw M5 × 35mm in this step. Also use the original aluminum spacers from your Shapeoko 2. The pulley can be positioned in a variety of places on the shaft of th Note: For Assassins use the included Flat Head Socket Cap Screw M5 × 35mm in this step. Also use the original aluminum spacers from your Shapeoko 2. The pulley can be positioned in a variety of places on the shaft of th |